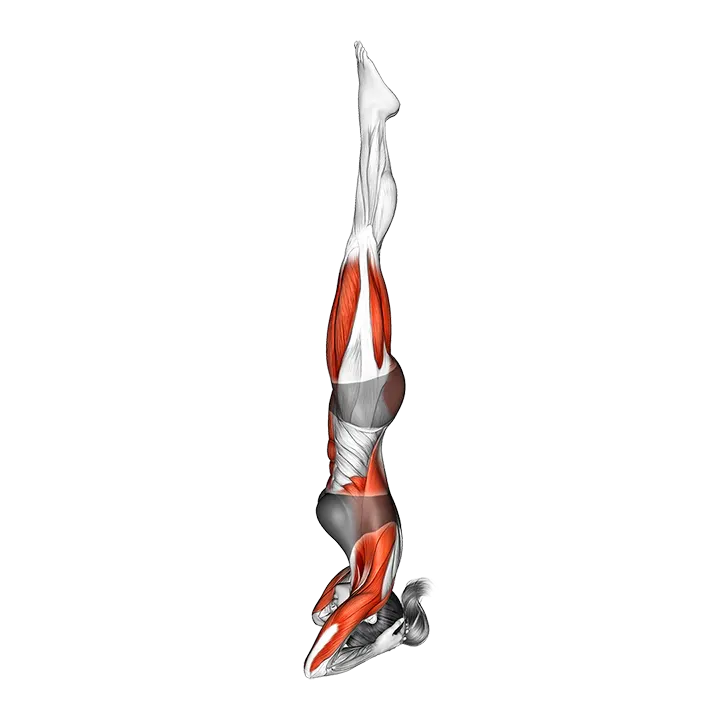
Supported Headstand Yoga Pose Sirsasana
- Target muscle
- —
- Equipment
- Body weight
- Body part
- Stretching
- Type
- Stretching
The Supported Headstand Yoga Pose (Sirsasana) is a foundational inversion that challenges whole-body coordination, requiring active shoulder stability, core bracing, and balance to hold the body vertical over the head. Using body weight only, the pose demands engagement from the shoulders and upper back to protect the neck, while the core works continuously to keep the spine aligned. It fits well into a yoga or stretching routine as a preparatory inversion for those building toward freestanding headstands.
How to do the Supported Headstand Yoga Pose Sirsasana
- 1Kneel on the floor and interlace your fingers, placing your forearms flat on the mat shoulder-width apart to form a stable triangular base.
- 2Set the crown of your head — not your forehead or the back of your skull — on the mat inside your cupped hands, so your hands cradle the back of your head.
- 3Tuck your toes, lift your knees, and walk your feet in toward your elbows until your hips stack above your shoulders as much as possible.
- 4Engage your shoulder blades by pressing your forearms firmly into the mat and lifting your shoulders away from your ears; this protects the neck throughout the pose.
- 5If you are a beginner, position yourself facing a wall about one foot away so the wall can catch your feet if you go too far.
- 6Draw your core in and up, then slowly lift one foot off the floor, bending the knee and bringing it toward your chest.
- 7When you feel balanced, lift the second foot and bring both knees to your chest before gradually straightening the legs toward the ceiling.
- 8Hold the inverted position for 5–30 seconds while breathing steadily, keeping your core firm and your shoulder blades active.
- 9To come down, bend your knees back to your chest, lower your feet to the floor one at a time, and rest in Child's Pose for several breaths.
Form tips
- Press your forearms into the mat with equal force throughout the hold — the majority of your weight should travel through your arms and shoulders, not your head and neck.
- Keep your gaze directed slightly forward on the mat rather than looking around; moving your head mid-pose can destabilize the base and strain the cervical spine.
- If your lower back begins to arch, re-engage your core and tuck your tailbone slightly to restore a neutral spinal position.
- Practice near a wall until you can hold the pose for at least 30 seconds with control before attempting it in open space.
- Never kick up hard to get into the pose; a controlled, gradual entry reduces the risk of overshooting and protects both the neck and the surrounding environment.
Common mistakes
- Bearing weight on the top or back of the skull instead of the crown — this misaligns the cervical spine and concentrates unsafe compression on the neck vertebrae.
- Allowing the shoulders to collapse toward the ears — when the shoulders shrug up, the arms lose their supportive role and the neck absorbs excess load.
- Kicking up with momentum — a forceful kick bypasses the core control needed for balance and risks overshooting the vertical line, leading to falls or neck injury.
- Holding the breath — breath retention increases tension throughout the body, reduces awareness of body position, and cuts the hold time unnecessarily short.
- Entering the pose with cold muscles — attempting the headstand without adequate warm-up in the shoulders, spine, and hamstrings reduces stability and increases injury risk.
Frequently asked questions
What muscles does the Supported Headstand work?
The pose does not isolate a single target muscle; instead it demands coordinated engagement across the whole body. The shoulders and upper back stabilize the base, the core holds the spine in alignment, and the legs extend actively to maintain balance in the inverted position.
Is the Supported Headstand safe for beginners?
It can be safe for beginners when approached correctly — start facing a wall, build shoulder strength with preparatory poses such as Dolphin Pose, and only enter the inversion once you can hold a stable forearm balance for several seconds. Anyone with neck injuries, high blood pressure, or glaucoma should consult a doctor before attempting inversions.
How long should I hold a headstand?
Beginners should aim for 5–15 seconds and gradually extend the hold as strength and confidence grow. Experienced practitioners may hold the pose for 1–5 minutes, but duration should always be secondary to maintaining clean alignment and steady breathing.
What is a good alternative to the Supported Headstand?
Dolphin Pose (forearms on the floor, hips lifted high) builds the shoulder stability and inversion comfort needed for the headstand without requiring you to bear any weight on your head. Legs-Up-the-Wall Pose is another accessible inversion option that provides similar circulatory benefits with minimal neck involvement.
How do I avoid neck strain in the Supported Headstand?
Place the crown of your head on the mat and actively press your forearms down so that your arms carry most of the load. Keep your shoulder blades firm and elevated away from your ears throughout the hold, and never rotate or tilt your head while inverted.







