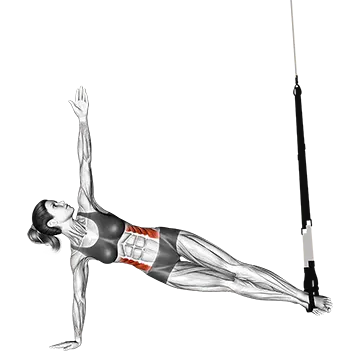
Suspension Side Bridge
- Target muscle
- Obliques
- Synergist muscles
- Adductor Brevis, Adductor Longus, Deltoid Lateral, Gracilis, Iliopsoas, Pectineous, Tensor Fasciae Latae
- Equipment
- Suspension
- Body part
- Waist
- Type
- Strength
The suspension side bridge is a lateral core stability exercise that primarily targets the obliques, with supporting work from the hip adductors (adductor brevis, adductor longus, gracilis, pectineus), tensor fasciae latae, iliopsoas, and lateral deltoid. By suspending both feet in the cradles, the unstable surface intensifies the anti-lateral-flexion demand, making it an effective progression from a standard side plank for intermediate and advanced trainees.
How to do the Suspension Side Bridge
- 1Set the suspension trainer so the foot cradles hang roughly 12–18 inches above the floor.
- 2Sit sideways next to the anchor point, loop both feet into the cradles stacked on top of each other, and carefully roll onto your side.
- 3Place your supporting forearm flat on the floor directly under your shoulder, elbow at 90°, forearm perpendicular to your body.
- 4Brace your core, squeeze your glutes, and press through your forearm to lift your hips until your body forms a straight line from head to heels.
- 5Stack your hips vertically so your top hip points directly toward the ceiling — neither rolling forward nor back.
- 6Hold the position for the prescribed duration, breathing steadily and keeping your hips fully extended and level.
- 7Lower your hips under control to the floor, carefully remove your feet from the cradles, and repeat on the opposite side.
Form tips
- Think about driving your bottom hip upward rather than just holding it — actively contracting the obliques this way increases muscle tension throughout the hold.
- Keep your neck in line with your spine; avoid craning your head up or dropping it toward the floor.
- Press your top hand firmly against your top hip to help cue vertical hip alignment and resist any rotation.
- If the straps swing, slow your setup and brace before you lift — eliminating swing at the start makes the hold far more stable and effective.
Common mistakes
- Letting the hips sag toward the floor, which removes tension from the obliques and shifts load onto the lower back.
- Allowing the hips to rotate forward or backward, which turns the exercise into a quasi-plank and reduces lateral core isolation.
- Collapsing or shrugging the supporting shoulder, which places excessive stress on the shoulder joint and destabilizes the entire position.
- Holding your breath during the hold, which spikes intra-abdominal pressure and accelerates fatigue — exhale steadily throughout.
Frequently asked questions
What muscles does the suspension side bridge work?
The primary target is the obliques. The adductor brevis, adductor longus, gracilis, pectineus, tensor fasciae latae, iliopsoas, and lateral deltoid all act as synergists to stabilize the hips and shoulder against the unstable suspension.
Is the suspension side bridge harder than a regular side plank?
Yes. Suspending the feet in the cradles introduces instability that forces the obliques and hip stabilizers to work harder to resist both sagging and rotation. It is best treated as a progression once you can hold a standard side plank with solid form for 30–45 seconds.
How long should I hold the suspension side bridge?
Aim for 3 sets of 20–40 seconds per side for strength-endurance. Once you can hit 45 seconds with perfect alignment, consider adding a hip abduction or a rotation challenge rather than simply extending the hold time further.
Where should I feel the suspension side bridge?
You should feel the primary work along the side of your waist (obliques) and a secondary burning sensation through your inner thighs and hip area. If you feel it mostly in your lower back or shoulder, reset your alignment — hips are likely sagging or the supporting shoulder is collapsing.
What is a good alternative to the suspension side bridge?
The standard side plank and the cable side plank are the closest alternatives that also target the obliques with an anti-lateral-flexion demand. For a similar instability challenge, a side plank on a BOSU or with the feet elevated on a bench are reasonable substitutes.